Restore Partition Mac
Failed to restore partition on my Mac OS X
I tried to remove my Windows partition and restore its space back to a single partition on my mac by using Bootcamp assistant. However, when i do so, Bootcamp assistant showed a message that there is an error in restoring the partition. so, I ignored the message and tried to restore it again but this time it froze. with no choice, I had to quit bootcamp assistant. Now comes the main problem. When I opened bootcamp assistant again, the windows partition that I wanted to restore vanished. I tried to check-in Disk Utilities and it’s not there also. I tried File System Check and it still didn’t work.
Thank you in advance
Can you help me, please… I really need to fix this soon…
MacBook Pro, OS X Mountain Lion (10.8.4), MacBook Pro (mid-2011)
It does happen that sometimes we lost the partitions or volumes on our Mac OS X. You may find that you couldn’t access your Mac partitions, what’s more, worse, you’ll find your important data has gone. Then you need to restore/recover your missing partition on Mac. Just read this guide and follow the steps to repair or restore your Mac partitions.


With Disk Drill, the Mac Partition Recovery software, you can search, repair, and restore your lost, deleted, or damaged Macintosh volumes. With several powerful tools, Disk Drill has several innovative ways to maximize your data recovery.
With Universal Partition Search, you can recover deleted partitions on Mac HFS+, FAT, and NTFS volumes and create a virtual partition for any ones that are found.
The Scan for Lost HFS+ Partition will find and rebuild HFS+ partitions on your Mac that have been reformatted. While Rebuild HFS+ Catalog File, which can rebuild the catalog of an HFS+ partition that won’t mount correctly.
How to restore deleted partitions on Mac OS X with Disk Drill?
Step 1. Download and install Disk Drill
The first step is to download the free Disk Drill application from the above download link. It requires Mac OS X 10.8.5 or later. After downloading, find the “diskdrill.dmg” file in your Downloads folder and double-click on it. Drag the Disk Drill icon to your Applications folder when prompted.
1. Download Disk Drill
2. Drag to Application Folder
3. Launch Disk Drill
Step 2. Select the disk or unpartitioned space for scanning
Once you have launched the application, you will be shown the list of available disks. Select the disk you wish to recover a lost partition from. Or you can click and select the newly appeared unpartitioned space (it will be shown as a separate partition titled “Unallocated” or “Not partitioned”).

Make sure you have selected the whole disk or unpartitioned space. Now click Recover (or Rebuild). The scanning may take some time. You can speed it up by defining the specific types of files that you’re searching for, such as text, video, audio images or other data.

Step 3. Preview, recover / restore lost partitions Mac OS X
When the scan completes, partitions that are found will immediately be scanned out and displayed in the resulting window. Click the “eye” icon next to the name to preview the files recoverable. To restore a partition on Mac, simply select the destination folder and click “Recover” to complete partition recovery on your Mac.

Prevent partition loss with Recovery Vault
Note: Disk Drill protects your data for losing again. By enabling Recovery Vault feature, once you ever need to perform OS X partition recovery on your hard drive, the Recovery Vault database will be found during scanning and your files will be recovered much faster and with much higher accuracy.

That’s it! You now know how to perform partition recovery for Mac OS X. Why not download the free Disk Drill Basic today and give it a try?
MacKeeper Files Recovery can Rescue Data on Mac:
Files Recovery can restore accidentally deleted files even if they were removed from the Trash. Files Recovery restores the most popular formats for the HFS+ file system and all possible file formats for the NTFS and FAT file systems. They are:

Restoring Files on Mac with MacKeeper Files Recovery
MacKeeper Files Recovery is a fast, safe, and easy data rescue Mac tool that will securely restore accidentally deleted files. It will also offer a lot of other powerful features in addition to Macintosh data recovery. Click the blue-button to download it from its official website!
Let’s see How Files Recovery works.
Step 1. Open Files Recovery and Scan Macintosh HD
To begin with, select the volume from which the lost files were deleted, then click Start Scan. You will be prompted to enter the Mac user password, and then MacKeeper will perform a complete scan of the volume to locate your lost file(s). It may take quite long since Files Recovery sometimes needs to collect tiny bits of the files from all over the storage device. The scanning time also depends on the volume size. An average time of scanning is 650Mb of free disk space per minute.

You will see the scan progress in the progress bar below. You can select another volume by clicking the Back button.
Returning to the volume selection will lose the current scan results.

If the scan takes a lot of time, you can pause it by clicking Stop and resume it later even if you quit the application.
To resume the scan, click Scan and then Continue in the dialog that appears. If you click Scan, the scan will be started all over again.

Step 2. Check the found files
While scanning process, the files that can be recovered will be appearing one by one. Narrow down the search results by selecting the file type: Images, Documents, Music/Sound, Video, Archives or Raw Photos. You can also locate your file(s) using the Filter field. Click the Quick Look button or press space bar on your keyboard to preview the file(s).

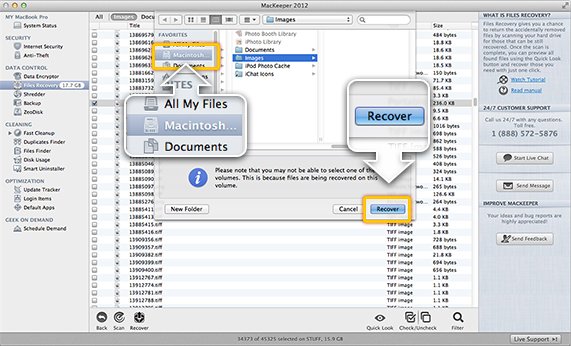
Step 3. Preview and Restore Files on Mac
Click the found files one by one to preview. Make up your mind and select the files and click Recover.

Select where to save the recovered files, then wait until MacKeeper carefully restores your file(s) byte by byte.
Open the Finder window to check whether the files are restored. The recovered files will be located in the folder you’ve selected with the item type names, e.g. Images, Documents, Music, Photo.

If you want to scan the drive one more time, click Rescan.