MacKeeper Files Recovery
Restoring Deleted Files on Mac
- Files Recovery scans your hard drive for deleted files that can be still restored;
- Restore accidentally deleted files even if they were removed from the Trash;
- A deep scan ensure complete data restoring on your Mac;
- Preview all found files using the Quick Look button once the scan is complete;
- Recover deleted files you need with just one click.

System Requirements: Intel Mac OS X 10.5 or later, Go to Windows Data Recovery for Windows users.

MacKeeper Files Recovery can Rescue Data on Mac:
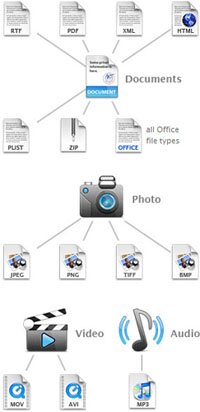
Files Recovery can restore accidentally deleted files even if they were removed from the Trash. Files Recovery restores the most popular formats for the HFS+ file system and all possible file formats for the NTFS and FAT file systems. They are: Audio: .mp3, .wav, .cda, .qcp, .rmi, .mid Video: .mov, .avi, .mp4, .vod, .mpg, .swf Photo: .bmp, .jpeg, .jpg, .tif, .tiff, .png, .icns, .svg, .gif, .psd, .psb, .dwg, .dxf Raw photos: .nef, .srw (or .dng), .kdc, .arw (or .sr2), .3fr, .dcr, .dng, .cr2, .orf, .pef, .raf, .mrw, .x3f Documents: .rtf, .xlsx, .docx, .pptx, .doc, .ppt, .pdf, .plist, .html, .xml, .pages, .numbers Archives: .zip, .rar, .7z
Restoring Files on Mac with MacKeeper Files Recovery
MacKeeper Files Recovery is a fast, safe, and easy data rescue Mac tool that will securely restore accidentally deleted files. It will also offer a lot of other powerful features in addition to Macintosh data recovery. Click the blue-button to download it from its official website!

Let’s see How Files Recovery works.
Step 1. Open Files Recovery and Scan Macintosh HD
To begin with, select the volume from which the lost files were deleted, then click Start Scan. You will be prompted to enter the Mac user password, and then MacKeeper will perform a complete scan of the volume to locate your lost file(s). It may take quite long since Files Recovery sometimes needs to collect tiny bits of the files from all over the storage device. The scanning time also depends on the volume size. An average time of scanning is 650Mb of free disk space per minute.

You will see the scan progress in the progress bar below. You can select another volume by clicking the Back button.
Returning to the volume selection will lose the current scan results.

If the scan takes a lot of time, you can pause it by clicking Stop and resume it later even if you quit the application.
To resume the scan, click Scan and then Continue in the dialog that appears. If you click Scan, the scan will be started all over again.

Step 2. Check the found files
While scanning process, the files that can be recovered will be appearing one by one. Narrow down the search results by selecting the file type: Images, Documents, Music/Sound, Video, Archives or Raw Photos. You can also locate your file(s) using the Filter field. Click the Quick Look button or press space bar on your keyboard to preview the file(s).

Step 3. Preview and Restore Files on Mac
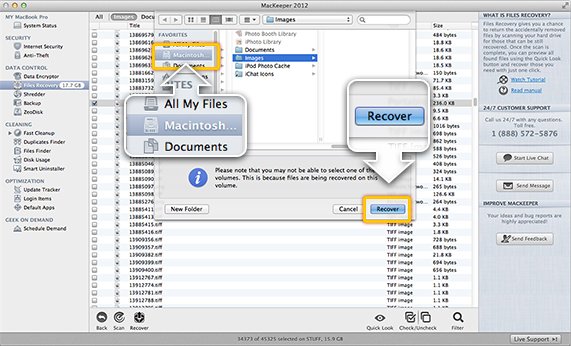
Click the found files one by one to preview. Make up your mind and select the files and click Recover.

Select where to save the recovered files, then wait until MacKeeper carefully restores your file(s) byte by byte.

Open the Finder window to check whether the files are restored. The recovered files will be located in the folder you’ve selected with the item type names, e.g. Images, Documents, Music, Photo.

If you want to scan the drive one more time, click Rescan.


