Recover Lost iPad Data
How do I recover deleted files from my ipad2?
I am using iPad 2 and is working fine but unfortunately, I deleted a huge song file. It was the result of my efforts of many days so I don’t want to lose it like that. Is there any way to recover those deleted files? If yes then provide the methods as soon as possible as it is difficult for me to wait for a better answer for a long time..
My brother accidentally deleted almost all of the pictures that we had on our iPad 1. These pictures have never been synced, and are very important! Is there an app that could recover these pictures? About 200 photos have been deleted. ANY way to recover these photos would be gratifying.
For iPad users these scenarios are not strange. The accident happens so you lost our photos, music, videos or notes on your iPad. Afterward, you begin to realize that you have made a serious mistake since these files are very important and precious for you and you really can’t lose them.
In fact, the data or files deleted from your iPad haven’t been erased permanently, what delete means that iPad has removed the file from the disk drive and listed its space as available and re-usable space.

Therefore, you can still get back your lost data or files if you manage to start a recovery process before your iPad use that part of the hard drive to create any new file.
How to recover lost iPad files including photos, videos, songs, notes and Safari Bookmarks?
To recover your lost data from iPad, you should at first stop using your iPad to prevent your iPad from overwriting, then concentrate on the recovery process by using a proper iPad recovery software.
Here I’ll describe two ways that you can follow to retrieve/restore/recover your accidentally deleted photos, pictures, music, videos, etc. from iPad 1, iPad 2, the new iPad, iPad with Retina Display and iPad Mini.
Here you need an iPad data recovery tool for scanning and recovering deleted or lost files: iOS Data Recovery.
iPad Data Recover
By scanning your iPad device or extracting iTunes backup, it enables you to recover lost notes, contacts, messages, photos and videos, call history, calendar, reminder, safari bookmark, and WhatsApp conversations. no matter your device is iPad Pro, iPad Air, iPad Min, or iPad.
For iPad 1, you can directly scan it and retrieve recently deleted media files like photo and video, voice memos and voicemails, and even WhatsApp attachments.
Part 1: Directly Recover Lost Data on iPad
After downloading the iPad data recovery, install and run it on your Mac or PC. Then choose the “Data Recovery” among the function modules.

Step 1. Connect iPad to the Mac/PC
Connect your iPad to the computer with its original USB cable. The program will automatically detect your iPad device and show you the interface like below. Select the file types you want to recover and click “Start Scan” to start scanning your iPad directly.

Turn off auto sync itunes 12: You’re supposed to have downloaded the latest iTunes on your computer before launching dr.fone iOS Recover. To avoid the automatically sync, don’t launch iTunes when running dr.fone. I suggest you to disable the automatical syncing in iTunes beforehand: launch iTunes > Preferences > Devices, check “Prevent iPods, iPhones, and iPads from syncing automatically”.
Step 2. Scan your iPad for lost Data
Here goes for scanning iPad device. After clicking Start Scan your iPad, the program will automatically communicate with your device and scan it as below.

Step 3. Preview and Recover Lost iPad Data
After the scan, all recoverable data on your iPad will be found and displayed by categories like Camera Roll, Photo Stream, Photo Library, Contacts, Messages, and more. Preview them one by one and tick off those you want to get back and click “Recover”. For restoring text messages, iMessage, contacts and notes, you can choose Recover to Computer or Recover to Device. If you want to re-sync the deleted or lost files back to your iPad, just click Recover to Device.

Note: In the scan result, you’ll get all data including lost data and those still existing on your iPad device. If you only want to restore lost data, you can slide the button on the top “Only display the deleted items” to refine the result.
Part 2: Extract iTunes backup to get back lost iPad data
This recovery way is suitable users who have synced their iPad with iTunes before the files were deleted and they haven’t synced iPad with iTunes since the files were deleted.
Note: You should NOT SYNC your iPad with iTunes before restoring, or you will have your iTunes backup files updated with the recent one. When you prompted to update your iPad’s backup at the first step after selecting Restore, decline this prompt. Then restore your iPad files by following the steps below:
Step 1. Choose Recover from iTunes Backup File mode
This recovery mode is available for all iPad devices as long as you have iTunes backup on your Mac. launch the program and switch to “Recover from iTunes Backup File”.

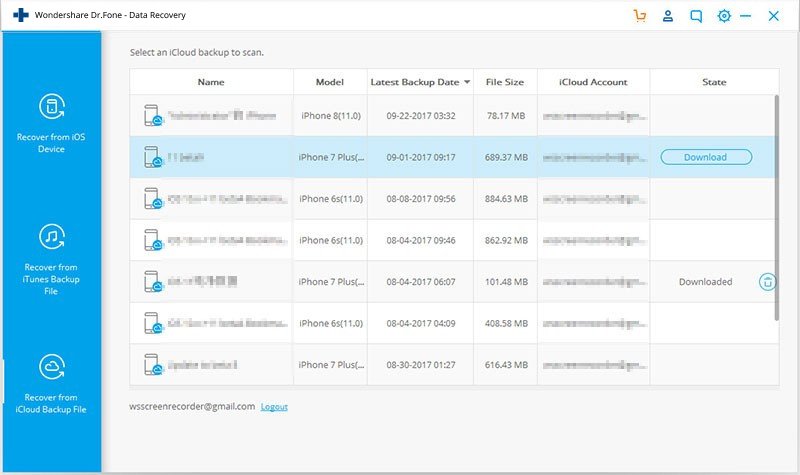
Step 2. Select the iPad backup to scan for lost data
Then you’ll get the following interface that showing all your iDevice backups. Select the one for your iPad and continue to “Start Scan” the details of the backup for preview and recovery.
Step 3. Preview and Recover lost iPad files
Then all the backed up files of your iPad are scanned out and displayed as the original. Now you can preview and check to recover your deleted or lost iPad notes, photos, videos, contacts, or calendar.

Then you’ll have all your lost data restored and retrieved.
Part 3: Retrieve Deleted or Lost iPad Files from iCloud Backup
If you don’t have an iTunes backup file, or just want to get an access to your iCloud backup content, this way is perfect for you. It allows you to preview your iCloud backup data one by one and selectively save them to your computer according to your need.
Step 1. Login iCloud Account
Once launch the iPad data recovery, switch to Recover from iCloud Backup File mode. Then you’ll be informed to sign in your iCloud account by entering your Apple ID and password. To protect your privacy, Dr.Fone for iOS never remember anything of your privacy. You don’t need to worry.

Step 2. Download iCloud backup file choose file to scan
When you log in, you’ll see the backup files are displayed as a list. Choose the one you need and click to download it.
A pop-up window will appear, asking you to select file types from the iCloud backup file to download. You just need to check the types of file you want for saving up your precious time.

Step 3. Preview and restore iPad data from iCloud backup
You can preview the data in iCloud backup file as soon as the scanning starts, and tick the item you want to restore while previewing. At last, you can save all the recoverable data to your Mac by tapping Recover button.
Tips: Now this iPad data recovery program supports re-syncing the found contacts, notes and messages back to your iOS device with your device connected by selecting Recover to Device.

OK! How awesome! When you tried to scan your iPad with the free trial version, you will be surprised that the scan would really recover those files. To continue with the recovery, you need to dr.fone – iOS Recover to get the full version.


Hello,
I downloaded your software, because my iPad 1 Notes program loaded up, showed its yellow screen blank, then closed. This happens every time I try it. However I know the notes are still there as when I search them on the iPad, the first line of text for each note comes up in search results (unless that is an “archived” previous version of them?)
Your software found my notes, but my problem is the preview text of each note carries “***********” these asterisks. Are they normally occurring in the preview, and not in the recovered files? Or will my recovered notes alo be “***********”? I know in the “lost” files they are intact, from doing a search for them.
Many thanks for your help!
Mark.
Mark,
The “*******” message indicates that the notes found by Dr.Fone for iOS can not be recovered. It’s a technical issue of the program. And this program will release a new version early in May which will fix this problem to a large extent. You can wait for the next version if you would.
Thanks.