Restore Deleted Photos on iPad
How to Restore Deleted Photos on iPad?
My brother accidentally deleted almost all of our pictures that we had on our iPad 3. These pictures are very important! Is there an app that could recover these pictures? About 200 photos have been deleted. ANY way to recover these photos would be gratifying.
Most iPad users may encounter data loss problems, such as accidentally deleted photos or videos of our iPad, get the iPad stolen or broken, the wrong deletion of the bookmarks, or notes lost pictures while transfers from your iPad to your computer. Is there any way to get the lost pictures back from iPad?

As the emergency happens, we could turn to a third-party iPad Data Recovery software for data retrieving help. That’s Dr.Fone iOS Recovery.
While Dr.Fone for iOS provides THREE recovery mode: Recover from iOS Devices, Recover from iTunes Backup File and Recover from iCloud Backup file. And it is fully compatible with all iPad models, like iPad Pro, iPad Air, iPad Air 2.
Anyway, no matter what type of iPad you lost photos and other files from, you can download the proper version to have a try. Next, let’s start restoring deleted photos on your iPad with Dr.Fone (Mac). Windows users choose the Windows version and take similar steps.
Download Dr.Fone toolkit from the above download link. Then install and launch it on your computer. After that, select the “Data Recovery” tool from the functional modules.

Part 1: Retrieving deleted photos by directly scanning iPad device:
Step 1. launch the program and connect your iPad
It’s time to connect your iPad device with a Mac computer. Your device will be recognized after connecting. Select “Recover from iOS Device” from the left blue column to enter the data type selection panel.
Make sure you checked the “Photos” Under “Exsited files in device” tab, and click on the “Start Scan” button to begin scanning it for deleted and existing data on it.
Note: If you have not synced your iPad with iTunes or iCloud, it will be difficult to recover all data from iPhone directly especially for photos and videos media content.

Step 2. Scan iPad device for lost photos, videos on it
You can directly click Start Scan on the window to scan your device for deleted as well as existing data on it.

Step 3. Preview and recover deleted photos from iPad
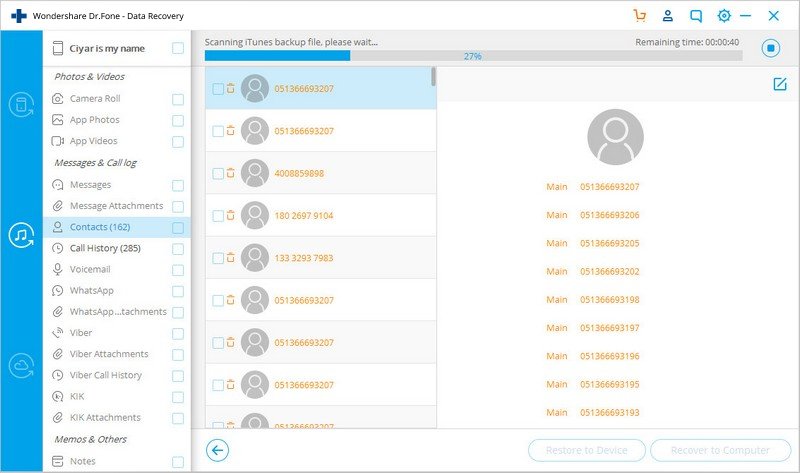
After the scan, all recoverable data on your iPad 1 will be found and displayed by categories like Camera Roll, Photo Stream, Photo Library, Note, and more. Preview the found photos one by one and mark those you want to get back and click Preview them one by one and tick off those you want to get back and click “Recover” to save the recoverable pictures on your Mac.

Part 2: Restore deleted iPad photo from iTunes backup
To use this method, you should ensure you have synced your iPad with iTunes before of the photo deletion. Instead of restoring the whole iTunes backup file, iPad data recovery allows you to extract the backup and selectively restore only photos and whatever you want from it. So simple in two steps.
Step 1. Select iTunes backup file and extract the content of it
Run the iPad photo recovery program and choose recovery mode – Recover from iTunes Backup File. The program will automatically find all iTunes backup files existing on your computer and list them as below.
Choose the iTunes backup file for your iPad and start extracting its content by clicking the “Start Scan” button.

Step 2. Preview and restore iPad photo from iTunes backup
After the scan, all recoverable data on your iPad 1 will be found and displayed by categories like Camera Roll, Photo Stream, Photo Library, Note, and more. Preview the found photos one by one and mark those you want to get back and click “Recover” to save the recoverable pictures to your Mac.
Part 3: Retrieve deleted iPad pictures from iCloud backup
Failed to retrieve iPad photos from device and iTunes backup? Be easy please! There’s the third way: restoring deleted data from iCloud backup file selectively.
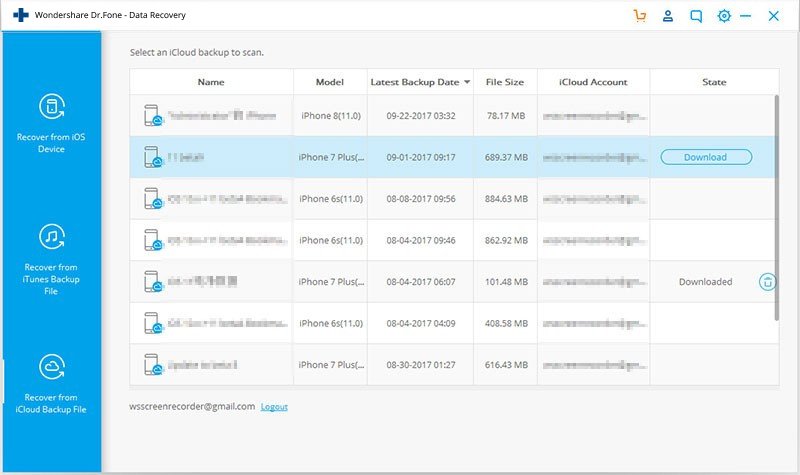
Step 1. Download iCloud backup file and scan the content
Select recovery mode – Recover from iCloud Backup File on the top of the program’s window. Then you need to login your Apple ID by entering the account and password.
The program never keep records of any your Apple account during your sessions. Just do it and don’t worry.

When you log in, you’ll get the list of all the backup files in your account. Choose the one you need and click to download it.
Step 2. Select Photo file type to download
To save up your time, you can choose the type of files you would like to download. Here you can select Photos and Videos and click Next continue.

Step 3. Retrieving deleted or lost photos and save
After the scan process, contents inside iCloud backup will all be extracted and shown in categories as the image below shows.
You can preview the found photos by clicking “Photos & Videos”, category on the left column. Then, tick the photos you would like to get back and click “Recover” button to recover and save them back to your Mac computer.

Note: The trial version allows you to extract photos from iTunes backup and preview them before paying for the recovery. Now you can get iPad Data Recovery Full Version with 20% OFF DISCOUNT!