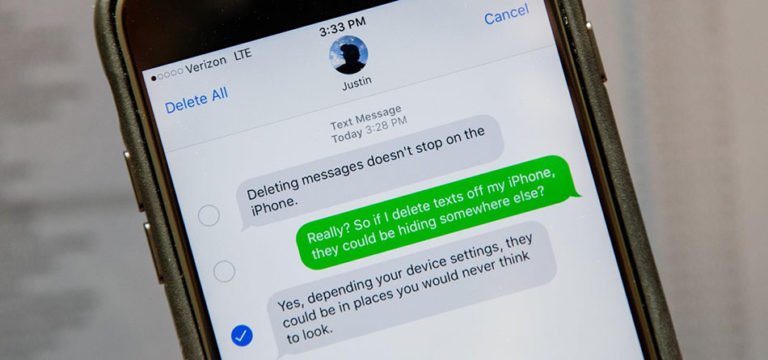
How to Recover Deleted iMessages on iPhone?
This is another iPhone tips and today we’re going to see actually how you can retrieve deleted iMessages on iPhone. Normally there’re several ways you can get back your iMessages that you’ve mistakenly deleted. If you have backed up your messages, you can restore iMessages from iCloud or iTunes backup. But sometimes it’s pretty difficult to avoid overwriting the current information on your iPhone by directly restoring from iCloud. Then, you will have to use the third-party software to selectively recover iMessage history.
Restore iMessages from iCloud Backup
In case that you’ve backed up your messages with iCloud or iTunes, you can retrieve deleted messages including text messages and iMessages to the same iDevice or another.
Here we’re going get into the process of restoring your iMessages or Text Messages to iPhone from iCloud backup.
Think of iCloud backup as a photocopy of your phone. Everything will be stored in one file that’s secure on your iCloud account. The only thing that it will not store is going to be your music. Most of the time because your music is coming from iTunes or to downloadable from the iTunes Store which I can show you in another tutorial. So today we’re going to show you how to erase your phone and restore from an iCloud backup. And if you’re starting your phone from new, this is how you restore from the backup as well. So, without further ado, let’s get into it.
First of All, Make Sure We Have an iCloud Backup
Alright, the first thing we want to do is make sure we have an iCloud backup.
- Go to “Settings” on your iPhone, and then tap the icon of your name.
- Go to “iCloud”, scroll all the way down to “Backup”. And it should show you what the last backup was.
- If you have backed up your phone to iCloud regally, you can restore your device to an earlier state before those messages were deleted.
The Next Thing – Erase All Data from Your iPhone or iPad
As long as you have a backup, you can start to wipe all of your personal data, and return your iPhone or iPad to the clean state.
- Open “Settings” on your phone, tap on “General”.
- Scroll down to “Reset” and tap it, and then “Erase All Content and Settings”.
- You have to put in your passcode and confirm to erase iPhone.
- Once it starts to erase, you’ll see the taskbar that show up with the Apple logo indicating that it’s erasing your phone.

Once the wiping process is complete, you can set up your iPhone as a new device, and restore from iCloud backup.
At last – Restore iMessages from iCloud Backup?
- Once your phone is erased, you’ll be greeted with your welcome screen.
- Basically go through the setup as if it was a new phone.
- Select your language, your country, and choose a Wi-Fi network.
- Then, reach “Restore from iCloud Bckup” under “Apps & Data”, just click it.

Here you can also choose to restore your messages from iTunes backup, in case you’ve backed up your device to iTunes instead. Plug your phone into your computer and choose “Restore from iTunes Backup” instead.
- Here you need to sign in to iCloud with your Apple ID.
- Once you’ve done, you will be able to see the backup file you’ve made. Choose the one that most relevant, and the transfer starts.
- Your phone will reboot and you’ll see your screen indicating that your restore is entering its final stages.

Keep in mind, if you’re restoring an iCloud backup that requires a newer version of iOS, you need to update your software first, and then do the steps that we started with as far as erasing the phone and then restoring from the backup. You can follow the onscreen steps to update, or learn what to do.
By restoring your iPhone from iCloud backup, you can get access your initial iMessages that you’ve deleted.
However, I have to say that there’s a big problem. In order to restore iMessages and other files from a backup your iPhone or iPad, you have to give up all the newer data after the backup was made. Is it possible to selectively restore only iMessages, while keeping other content, settings, and everything else as the current state? This is what we’ll discuss in the next method.
How to Selectively Restore iMessages from iCloud Backup?
Third-party recovery software can perform selectively restoring iCloud/iTunes backup, like dr.fone – iOS Recover by Wondershare,FoneLab by Aiseesoft, or iMobie PhoneRescue for iOS.
As few people would like to wipe all of their personal data and restore from backup for messages, this solution is more elegant. Here I’m going to use dr.fone – Recover to selectively recover iMessages from backup.
Firstly, download and install the iMessage recovery software
Download and install Dr.Fone – iPhone Data Recovery on your computer. It fully supports Windows and Mac operating systems, including the latest Windows 10, and macOS Mojave. Choose the version from the following link. And here I’m going to launching it on my latest macOS Mojave 10.14.5.
Drag dr.fone into Application folder.

- Dr.Fone will automatically install it on your machine.
- Double click dr.fone in your Application, and click Open in the pop-up window to confirm and open it.
- dr.fone toolkit will instantly launch on your macOS, now click “Data Recovery” from the function modules.

Login your iCloud account from the software
By openning the recovery software, you can see there’re three options you can choose. To partial restore from iCloud backup, select the third option – Recover from iCloud Backup.
Then you’ll be asked to enter your Apple ID and password to log in your iCloud account. dr.fone takes your privacy seriously and never record any of your personal information during the sessions. So you don’t need to worry about your personal data leaking.

Selectively restore iMessages from iCloud
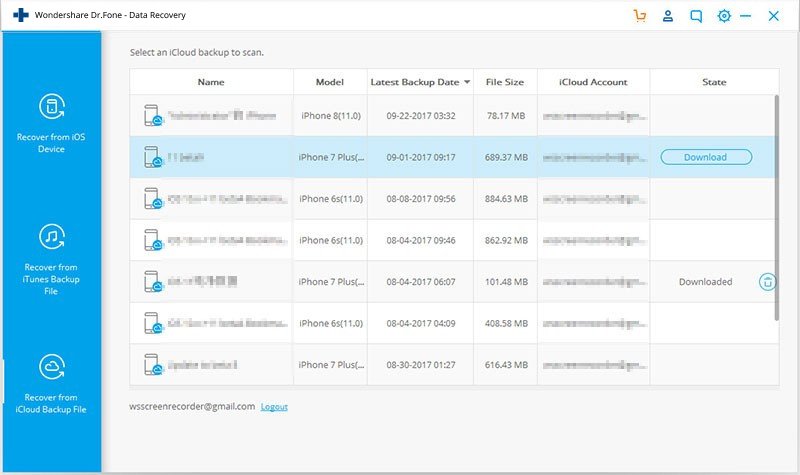
1. When you logged in your iCloud account, you will see there’re several backup files that you’ve made in your account. Find the one that contains the iMessages you’ve deleted and need to recover, click Download button on the right.
2. Let dr.fone – Recover scan the downloaded iCloud backup file. Then click Messages Under Message & Contacts on the left list, you will find all the messages.
3. Check one by one and preview them in the right window, find the one you want to retrieve, and click Recover. The conversations you chose will be restored and saved on your computer in CSV or HTML format.

How to Recover Deleted iMessages Without Backup
The two above solutions are based on the fact that you’ve made a backup of your iPhone by iCloud or iTunes. However, not everyone is so that lucky. We could accidentally delete messages and files without any backup. Can we directly retrieve deleted iMessages from iPhone or iPad devices?
You should have already noticed that there’re three different recovery modes in the iPhone data recovery software we used in solution 2. Yes, the first recovery mode – Recover from iOS Device is going to allow you directly scan your iDevice and recover iMessage, Text Messages, Contacts, Notes, Safari Bookmarks, Photos, Video, Music, App’s photos/videos/documents, and whatever you’ve deleted or lost, in case they’re not overwritten.
Alright, without further ado, we’ll start by launching dr.fone again.
After running dr.fone – Recover on your Mac, connect your iPhone or iPad with the USB cable to make your device recognized.
Scan your iPhone to find deleted iMessages
The next screen will ask you to select the type of data you want to recover. This step is helpful especially there’re huge size of data on your phone. Select Messages & Attachments, and any other data type you wish to restore. Click on Start Scan button to begin scanning process.

Preview and recover deleted iMessages on iPhone
The scan will take you a few minutes. Just wait for a while. When the scanning completed, click Messages from the left category. From here, you can get all deleted iMessages, Text Messages and MMS from your contacts. Browse and read them clearly, and select iMessages you want to recover and click Recover button.

You could have your iMessages restored directly to your iPhone or iPad device, or just save them to your computer. Bringing back your precious data has never been so easy.